Yoga: Hands on Assisting AGENCY, INTENTION, ACTION

1:24 PM 0 Comments A+ a-


I have done something that has been in the planning and development stages for seven years. I have compiled all of the hands-on assists I've learned through two intensive weekends and countless yoga classes into a single spiral-bound book that you can purchase from Lulu.com, find it in the Amazon marketplace, or buy a copy from my Square shopping site. 

This book includes 117 clear line drawings illustrating more than 38 hands-on assists commonly used in Power Yoga studios. These drawings are accompanied by easy-to-understand explanations of hand positions and the impact each assist has on your students' practice.

The front cover shows what you can expect to see inside the rest of the book. I will post more photos of the finished print-on-demand book when the copies I ordered arrive.

Print on demand from Lulu.com: https://bit.ly/HandsOnAssistingBook

Amazon marketplace: https://www.amazon.com/dp/1312051108

Square shopping site: https://jentechyoga.square.site/

Fun fact, as an independent seller on Amazon, they charge me 15% of the book price + a $1.80 "variable closing fee" for each book I sell there. This is a total of $8.19 per book, which is a pretty hefty percentage. Square charges 2.9% plus 30 cents per online transaction. 

Leading a Powerful Power Yoga Class (what you need to know, in 9 minutes)

3:45 PM 0 Comments A+ a-


 I created this 9 minute video to give you the information you need to lead a powerful power yoga class. These are the essential items which seem too simple to be real, but believe me - simple is best and simple is often challenging to put into practice.


Sandbags for Yin Yoga - pattern & supplies for DIY

3:49 PM 0 Comments A+ a-


This is a simple pattern for making sandbags for Yin Yoga.

Use wrapping paper, paper bags from the grocery store or the packing material you might have to create a pattern with these dimensions. You will have three pieces to this pattern. This drawing is not to scale and is for representational purposes.

The largest pattern piece for the sandbag outer casing is 18 inches x 8.5 inches. If you want to add a logo or embelishment, chalk mark 1.5 inches in from lower left corner.

Smaller back portion of outer casing is 7.5 inches wide x 8 inches tall.

Larger back portion of outer casing is 12 inches wide x 8 inches tall. 

4 inch nylon zipper (this is what I had on hand. If I had to do it over, I would've used a wider zipper)

1 inch wide nylon webbing, cut to 9 inches long. Sew handles on both ends of the sandbag for easier transportation. Sew handles at 1 1/2 inches from the top edge and bottom edge.

For the sandbags I made, I used ripstop nylon leftover from a previous project and recycled bed linens. I made two sleeves for each sandbag. One out of the ripstop nylon and one out of the bedsheet, giving each sandbag a second layer of protection agains seam breakage and potential future sand leakage.


I cut the inner sandbag sleeves approximately 7 inches wide and 20 inches long. I serged the fabric on three sides (or cut some as one long rectangle & then I only had to serge two sides). I turned the sleeves inside out so that the serged seams were on thie inside and filled each of them with 7 1/2 pounds of play sand. Then I serged the top edge closed and put this inside another bedsheet sandbag layer, serging the top of that closed. Play Sand comes in 50 pound bags from the hardware store for $6. The sand is washed and filtered and is perfectly suited for this project. Any moisture in the sand will evaporate over time and you do not need to worry about baking the sand or otherwise taking great measures to dry the sand out before using it. Over the course of a few days, the sand bags dried out and I had no issues with mold or dampness persisiting with the sandbag innards.

The only sewing directions of note is how to create an invizible zipper enclosure. You do this by using a basting (long) stitch to connect the two back pieces of the pattern together. Use a back stitch when you start stitching, when you reach the point that will be the top opening for the zipper, the bottom opening for the zipper and the bottom of the zipper seam. Press the seam flat. Sew the zipper into this section, as pictured, taking care to sew across the top and bottom of the zipper several times to create a barrier against the zipper opening too much and tearing the stitches. This does not need to look perfect. It only needs to be functional and resistant against breakage. Noone will care if your top stitching is straight. I promise.

When you've finished sewing the zipper into the basted seam, turn your fabric over and use a ripper tool top cut through the stitches where the zipper is located.

The beauty of this project is that you don't have to worry about how straight your stitches are, or how sharp the corners are sewn. There is a lot of wiggle room and no matter how messy it might look on this inside, the sandbag will serve its purpose, and be put to good use regardless of how well you do or do not sew.

The cost of supplies was $16 for the nylon webbing$17 for 100 4 inch zippers and $18 for 150 pounds of play sand. I ended up making 30 sandbags. Each 50 pound bag of play sand will make 7 sandbags weighing a little over 7 pounds each. Calculating all the supplies (which I have leftovers of zippers and webbing) and dividing by 30 makes each sandbag cost $1.70 in supplies. The least expensive yin yoga sandbag I found online was $22. It was much more cost effective to recycle bedsheets to avoid buying nearly $700 worth of sandbags.

Yoga Alliance Aligned Baptiste Power Yoga Teacher Training Manual Template

4:29 PM 2 Comments A+ a-


If you've been following along, you'll know that my yoga studio will be holding our first yoga teacher training in March of 2023. As part of the process of becoming a registered yoga school recognized by Yoga Alliance, I purchased a teacher training manual template from a mutual friend. I spent six months rewriting, reorganizing, redesigning and collaborating with our YTT team to create a document meeting the current Yoga Alliance curriculum requirements and reflecting the training we will be delivering.

All Y'All Yoga's Yoga Alliance registration process is now work in progress.

With that process started and that manual "completed", I set to work on this template which aligns to the Yoga Alliance 2023 curriculum guidelines and encompasses Baptiste Power Yoga teaching methodology, ready for anyone to edit to reflect the mission and ethos of their studio. 

This template is ready for you to edit, reorganize or rewrite to meet your yoga teacher training goals. I have reformatted this document into four different file types:  

  • Adobe InDesign 
  • Microsoft Word 
  • Google Documents
  • Canva Template

The images used within this template were created by me or taken from Wikimedia and used under Creative Commons Share Alike Attribution. The document color palette was designed to be readable when printed in black and white or color and the yoga postures are represented by gender neutral stick figures.

If you are interested in purchasing a copy of this YTT Template, please reach out to me.

 JenTechYoga 2023 YTT Template Inquiry

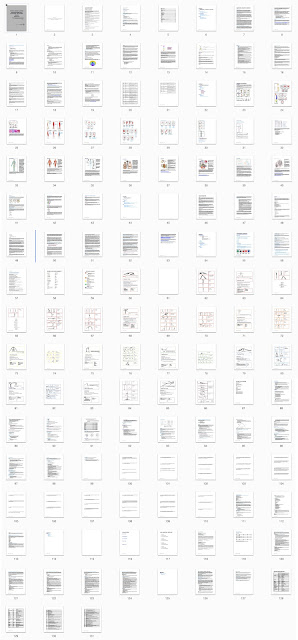
 Here are thumbnails of the pages and the table of contents and sections in the manual. Click to see them full size (readable).


Becoming a Registered Yoga School

1:41 PM 0 Comments A+ a-


I'm the kind of person who has to actually see the 'big picture' before I can break things down into a logical arrangement according to a calendar based time line. This is a long way of saying I have to write down all the things that are required before I can figure out how to convey the requirements.
Starting in August of 2020, All Y'All Yoga started on the path to becoming a Registered Yoga School. This starts with becoming familiar with the Yoga Alliance Requirements, the Lead Trainer requirements, and the documentation required when applying to become an RYS.

  • TRAINING MANUAL
  • DAILY SCHEDULE
  • POLICIES (6 IN TOTAL)
  • LETTER OF INTENT
  • SAMPLE CERTIFICATE
  • BACKGROUND/EXPERIENCE FOR LEAD TRAINERS AND FACILITY
  • TRAINEE SELECTION PROCESS
  • TRAINER:TRAINEE RATIO
  • CURRICULUM & HOURS ALLOCATION
  • ASSESSMENT METHODS
I achieved the Yoga Alliance YAECP® credential in August 2022 after completing Fit To Lead with the Baptiste Institute and clocking 1000 hours teaching, after becoming registered with Yoga Alliance in November of 2015. Having this step completed, I embarked on digesting all the content Yoga Alliance requires as part of a 200 hour Yoga Teacher Training program. I wrote it all down on my home office whiteboard so I could look at it every day and slowly begin to formulate a process for turning these topics into a daily schedule, training manual, curriculum & hours allocation and assessment methods.

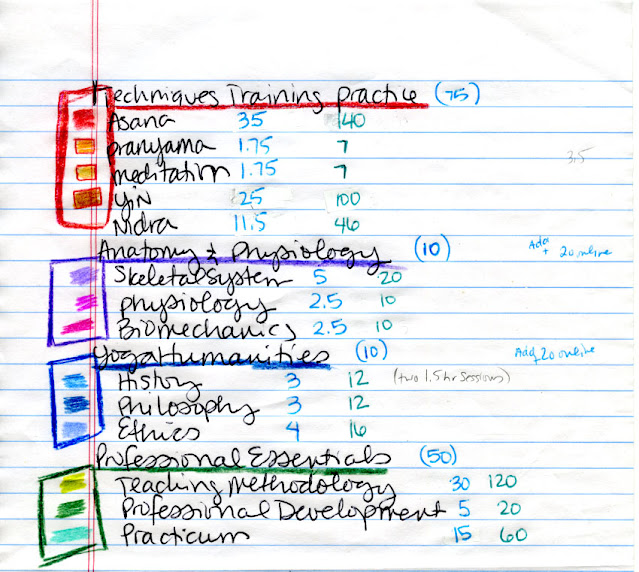
After many months of attempting to transform topics into a timeline, I came upon a formula for slicing the buckets of hours YA assigns to each major topic. I took the hours tied to each major topic and divided them into what I felt might be an appropriate distribution of time for each topic, weighting the topics and sub topics according to my perceived importance and complexity.


Our yoga studio will include training in Yin and Yoga Nidra as well as Baptiste Power Yoga, therefore the YA major topic of "Techniques, Training, Practice" got further divided into sub topics: Asana (Baptiste Power Yoga), Pranayama & Subtle Body, Meditation, Yin/Restorative and Yoga Nidra. 

Color coding the major topics and sub topics helped me see how the topics link to one another while I was working out how to distribute these major topics and sub topics over the course of the 200 RYT program.
 
Working within the constraints of when the studio has classes already on the schedule, and when we could have the studio space available to lead the RYT curriculum within an agreeable frame of time, we reached this scheduling conclusion. This schedule would allow us to deliver the YA content over the course of 7 weekends in 2023. Creating a YTT schedule where the days of training are long but not egregious was the goal.


Working with graph paper, I arbitrarily picked a small "bucket of time" to be represented by a single square in the graph paper notebook I was working in. This single bucket of time ended up being a 15 minute block of time, since 15 minutes is easy to work with in the context of hours of training and breaking up training vs teaching vs assessing over the course of a day.


Working through the major topics and required sub topics with colored pencils and graph paper allowed me to see how many "buckets" of time each day of training would have available through the 7 weeks. Once I had the major topics laid out in color, I began to lay out the sub-topics such as Skeletal System, Physiology, Bio-mechanics, History, Philosophy, Ethics and so on. Using Friday Evenings for the sub-topics that lend themselves well to lecture-based teaching seemed an ideal path. Once I'd set the Friday night schedules, the Saturday & Sunday schedules began to become clearer. 

I'd created a bulleted list of topics, sorted by importance, which I want to impart to our trainees regarding how to lead Baptiste Power Yoga. Using this bulleted list, I began to divvy up the large time buckets of Teaching Methodology and Practicum into smaller slots of time. Doing this will allow me to teach a concept, have the students practice the concept and then we can discuss how the practice went and receive feedback. Lather, rinse, repeat.

Looking at the bulleted list of prioritized topics in a spreadsheet format allowed me to build the Leader's Daily Agenda documents which we will use to keep us on time while delivering the training. Topic documentation, prioritization, and daily scheduling was also used to define the portions of the YTT dedicated to Yin/Restorative and Yoga Nidra.
 
I bought a copy of a YTT manual from a fellow Baptiste Power Yoga Studio owner to use as a template for the All Y'All Yoga YTT manual. I've edited, rearranged, removed and adding content to it since August and I have learned a lot about working with Adobe InDesign to create CharacterStyles, ParagraphStyles, Color Swatches, edit Anchor Options to keep images anchored to text fields. Working from an actual YTT manual gave me a foundation to start from, the confidence to strip away and add in content currently required by Yoga Alliance, as well as the content specific to All Y'All Yoga.

If you are also on the path to becoming a Registered Yoga School, perhaps this post will be helpful for you to organize your YTT weekends to meet the content requirements of Yoga Alliance. I know it is unlikely that your weekend start/stop times will be the same as those at All Y'All, but the concepts I've laid out for a way to organize the major topics, sub-topics and then divvy them up into a timeline will possibly be of use to you.

This Google Sheet will help you formulate your responses to the Yoga Alliance Application. Once you've completed the "Explanation for your RYS" for each of the core competencies, you'll be ready to copy and paste this content into the Yoga Alliance website when you are completing your Yoga School Registration application.
 

I created an offline template which can be used to pre-fill out your Daily Scheduler data. The Yoga Alliance website for creating the Daily Schedule doesn't allow for submitting this data and saving your progress. It's entered all at once. The spreadsheet I made will help you organize your data in such a way that you can enter your data into the YA website and know that you will be uploading your complete schedule content. This document is an Excel spreadsheet and not a Google spreadsheet, as I couldn't figure out how to create dependent drop down lists in a Google spreadsheet.

 
If you found any of this useful and you feel called to contribute, here is my PayPal account information. (click below)